Exchange Retention Policies, MRM, and Holds: A Guide
What are the retention options in Exchange Online? This guide covers Messaging Retention Management as one method for retention.


Published:
June 27, 2019
Last updated:
August 27, 2025

Finding it hard to keep up with this fast-paced industry?
Subscribe to FILED Newsletter.
Your monthly round-up of the latest news and views at the intersection of data privacy, data security, and governance.
Subscribe Now
Key Takeaways
- Exchange retention policies enable Messaging Retention Management (MRM) archiving and deletion.
- Compare MRM and Office 365 retention methods for hybrid vs cloud-only needs.
- MRM uses retention tags, policies, and Managed Folder Assistant to enforce schedules.
- Deploy by creating tags, configuring policies, applying single policy per mailbox.
- Implement retention actions and holds to automate archiving, deletion, and legal preservation.
___________________________________________________________________________________________________
Has your organization established its Exchange Online retention strategy? If not, it’s worth taking the time to set up your policies. Microsoft doesn’t back up your data for you, which means it’s up to you to develop a retention and recovery framework for your business.
The good news is that Microsoft offers powerful tools to help you manage how long your data is kept, when it's deleted, and how to recover or preserve it for legal or compliance purposes. This guide will explain how these features work, how to configure them, and what their limitations are.
What is Exchange retention?
Exchange retention is the ability to retain and delete information in Microsoft Exchange Online. There are two ways that you can do this natively.
- Messaging records management (MRM) helps you keep, archive, and delete information in exchange mailboxes. This approach works for Exchange Online. It has also worked for the on-premise version of Exchange, but in October 2025, support will only be available for the on-premise subscription edition, Exchange SE.
- Microsoft Purview retention labels and retention policies are managed in the Microsoft Purview compliance portal. This method uses a unified label to manage retention, deletion, disposition reviews, event-based retention, and more. You can use this for Exchange Online and other Microsoft 365 services.
Microsoft now recommends using Purview retention labels in most cases. It’s more modern and intuitive than the older built-in MRM solution. That said, MRM is still helpful for managing default email archiving and retention and for anyone still operating on a legacy configuration.
It’s important to note that both of these methods can work together, so you don’t have to choose one or the other. In this article, we’re going to be focusing primarily on messaging retention management (MRM).
Why retention is critical
An organization collects sensitive information as part of running its business. While it can be tempting to keep information forever, such an approach brings several regulatory, security, and organizational risks. Here are five reasons retention is so important:
- Compliance: Almost all compliance standards (such as HIPAA, GDPR, and SOX) have regulations around how data should be preserved, managed, and disposed of. Failure to comply can lead to significant financial penalties and reputational damage.
- Storage management: Exchange Online has a storage limit of 50 GB for most basic subscription packages, and 100 GB for higher tiers. Retention policies make sure businesses only keep essential data, saving employee time and improving efficiency.
- Security: The more data you possess, the more that can be exposed in a data breach or ransomware attack. There are many examples of companies whose failure to follow retention schedules has led to former customers' details being leaked.
- Recovery: Retention gives you the ability to recover emails that users delete by mistake. This can prevent permanent loss of essential data as well as disruptions that slow down your operation.
- Processing: When you have less data to search, your teams can find relevant information faster. While it enables you to make decisions faster, it’s also a huge benefit if you need to locate records for HR and legal investigations.
Retention schedules allow you to defensibly dispose of data in line with applicable privacy and data regulations and your business’s needs. This process is referred to as data minimization.
Retention tools in Exchange Online: An overview
As we’ve mentioned, Microsoft offers two native Exchange Online retention solutions:
- Messaging records management (MRM)
- Microsoft purview retention labels and retention policies
However, there are other third-party solutions available. The table below breaks down the options at your disposal.
Choosing between MRM and Microsoft 365 retention
So, what’s the difference between MRM retention and Microsoft 365 retention? Your current environment and the features you need will determine which is the right choice.
Here’s a table summing up some of the key differences to help you decide which is right for you.
If you’re running a hybrid exchange environment with both Exchange Online and Exchange SE, you’ll want to opt for MRM because Microsoft 365 labels only work with Exchange Online.
However, for most other applications, Microsoft recommends using Microsoft Purview retention labels and retention policies to manage your data. This approach is especially useful if you want to automate as much of the process as possible by applying retention labels to your entire environment.
How messaging records management (MRM) works
Messaging records management (MRM) gives organizations the ability to retain, archive, and delete mailbox items automatically through retention tags and policies. To configure it, you’ll need to access the Microsoft Purview portal. You’ll find the retention settings under the Exchange (legacy) section of Data Lifecycle Management.
We’ll explain exactly how to create and deploy MRM retention policies in the following section. But for now, let’s see how it all works:
Retention tags
Fundamentally, MRM relies on retention tags and retention policies to manage email data:
- MRM retention tags are labels that specify how long mailbox items should be kept and what actions should be taken once that time expires.
- MRM retention policies are collections of tags that are applied to mailboxes to automate email lifecycle management.
Retention tags are used to manage individual items and folders. There are three types available to you. These are the default policy tag (DPT), retention policy tag (RPT), and personal tag.
- Default policy tags apply automatically to any mailbox items that don’t have an existing retention tag applied directly or by inheritance from the folder. Only administrators can set up default policy tags.
- Retention policy tags apply automatically to the default folders that are created automatically in all mailboxes, such as the Inbox, Sent Items, and Deleted Items folders. Once again, only an administrator can set these up.
- Personal retention tags are used to manually label items and folders. Users can apply a personal tag to a single message or automate tagging by moving the message to a folder that already has a tag applied. Individuals can set up personal tags.
Let’s take a closer look at the different retention actions you can apply through these three tags.
.png)
What retention actions are available?
There are three main types of retention actions that you can apply with MRM: Move to archive, Delete and allow recovery, and Permanently delete.
- Move to archive: Transfers a message to the user’s archive mailbox at the end of the retention period. If there is no archive mailbox, no action will be taken. Note that this action is only available for DPT and personal tags.
- Delete and allow recovery: Moves items to the Recoverable Items folder. The items will remain in the Recoverable Items folder until the end of the retention period. This is similar to a user deleting an item manually and emptying their deleted items folder.
- Permanently delete: This action permanently deletes the message or item after the retention period. The item will be completely unrecoverable unless the mailbox or item has an in-place hold or litigation hold to preserve the items for legal action.
These tags and actions can be applied separately to folders and mailboxes. Alternatively, administrators can then group different tags together to create a retention policy, which they can apply to one or several user mailboxes.
Retention policies
As mentioned, retention policies combine multiple retention tags to apply rules across the board. Here’s what your policy can include:
- You can have one Retention Policy Tag per default folder.
- You can have one Default Policy Tag that moves items to an archive.
- You can have one Default Policy Tag that can delete items.
- You can have one Default Policy Tag that deletes voicemail messages.
- You can have any number of personal tags available for users to choose from.
Together, these tags can create a holistic policy that covers your entire environment. For instance, you might create a policy to automatically delete emails after 60 days, move older messages to a default archive, and retain important emails for compliance purposes.
It’s worth remembering that you can only apply one retention policy to a mailbox when using MRM. If you require multiple policies per mailbox, Microsoft Purview Retention Labels and Retention Policies offer this feature.
Managed Folder Assistant
Lastly, we should mention the Managed Folder Assistant for MRM. This throttle-based assistant will continually check mailboxes for new emails and items. When it finds one, if there is a retention policy that applies, it will stamp each item with the specifics of the retention policy. Once the retention period has passed, it will then carry out the action specified in the tag.
Essentially, the MFA is the background worker that will automatically carry out the retention tags and policies you specify. It’s always active, meaning you don’t need to set it up, schedule it, or maintain it. MFA has another handy feature; it will also periodically check for newly created or moved mailboxes.
Common MRM deployment scenarios
Before we get into deploying retention policies step by step, let’s touch on some scenarios where MRM deployment is helpful.
- Onboarding: You can apply a default MRM policy to new users so retention tags are in place from day one. This keeps things consistent and reduces the chance for a new user to slip through the cracks.
- Offboarding: You could also place a temporary retention hold on the mailboxes of employees who are leaving the company permanently or temporarily, letting you prevent premature deletion during the transition.
- Litigation: It’s a good idea to apply a retention hold before you put a mailbox on litigation hold. Doing so will prevent automatic processing or deletion while the legal process is prepared.
- Archiving: Lastly, it’s common to deploy MRM to archive older emails after a set period of time, primarily to save on storage costs and ensure more recent information is easier to find.
Creating and applying MRM retention policies
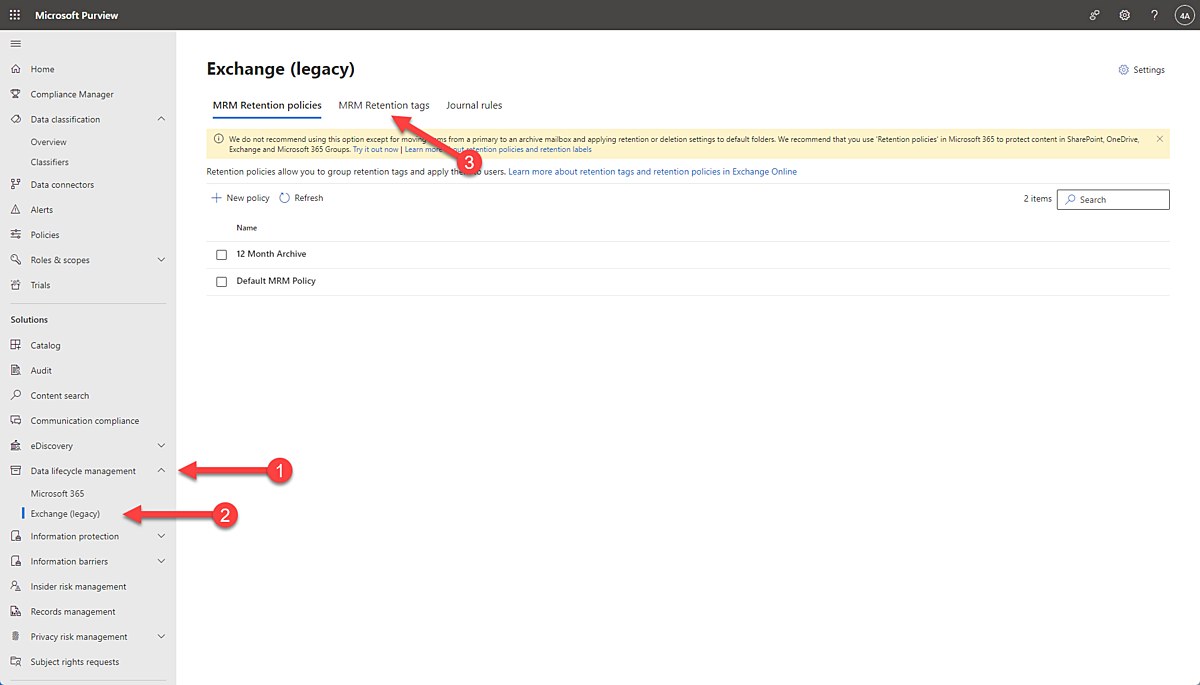
As we touched on above, MRM is now configured through the Microsoft Purview Portal. You can access the MRM settings by clicking Data Lifecycle Management and then navigating to the Exchange (legacy) subsection.
There are three steps you need to follow to create your MRM policies and deploy them for your organization:
- Create retention tags
- Configure the Exchange retention policy
- Apply the policy to mailbox users (limited to one policy per mailbox)
Let’s look at each of these steps one by one.
1. Create retention tags
Start by navigating to MRM retention tags under Exchange (legacy).
Then, click to create a New tag.
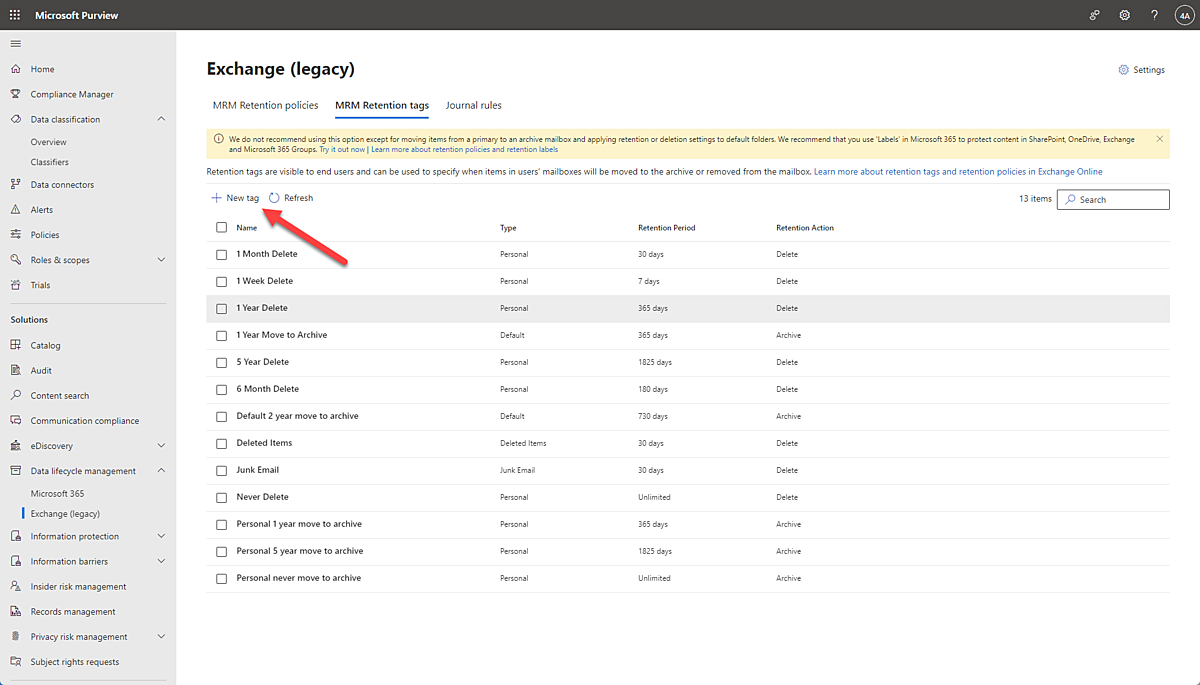
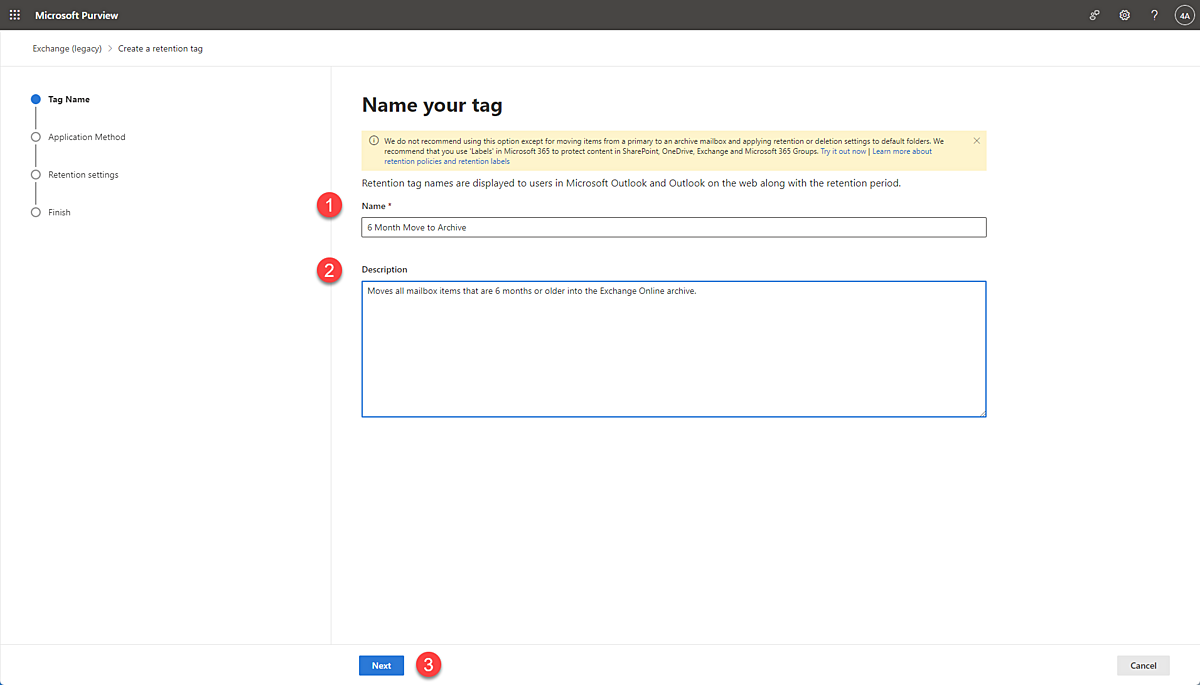
Give that tag a clear name and description. You should also describe what the tag is for. Being specific here will help with organization.
You’ll then be prompted to pick the type of retention tag you want to create, whether that be a default policy tag (DPT), retention policy tag (RPT) or personal tag.
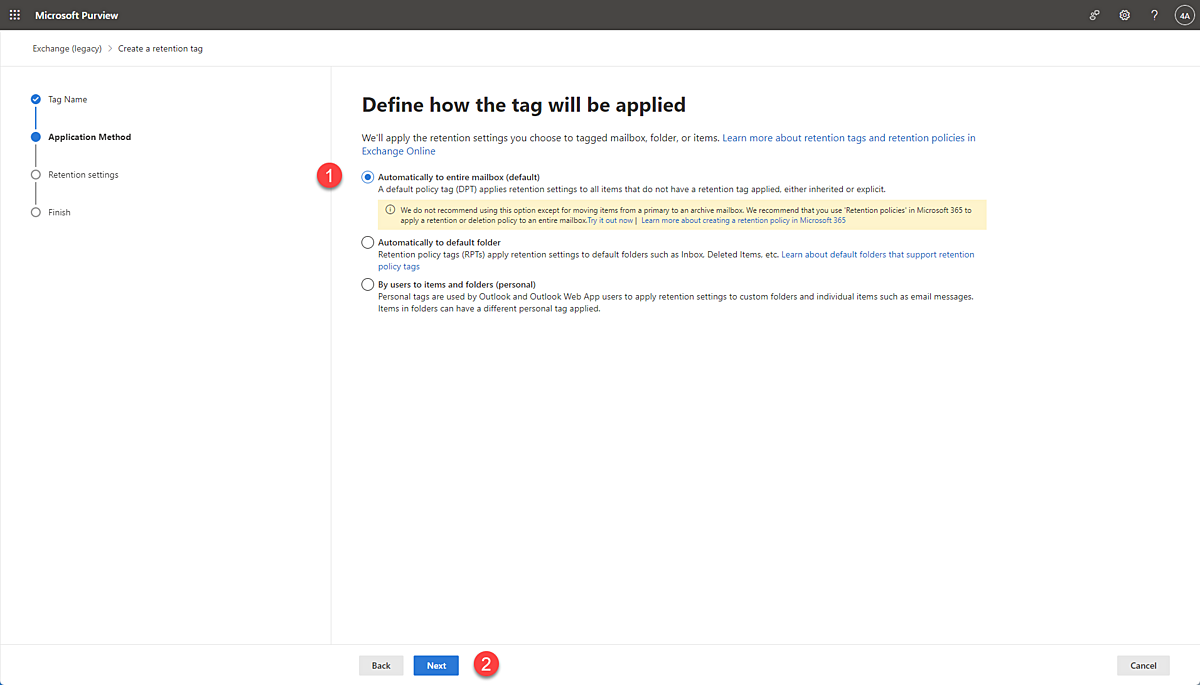
Finally, you’ll have the option to customize the settings of the tag, such as the retention period and the action taken once that period expires. For instance, you might choose to have all items within a specific folder be moved to archive after 45 days.
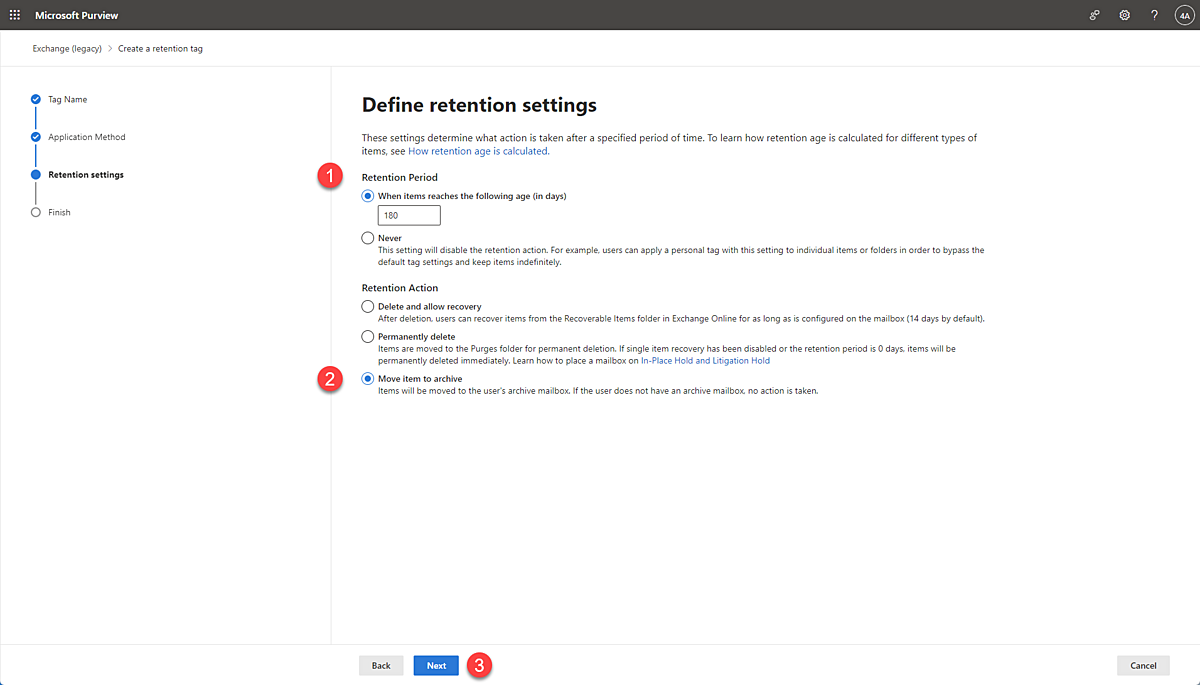
Once you’re happy with your selections, click Submit.
2. Configure the retention policy
Once you’ve created multiple tags, you’re ready to combine them into a single policy. Again, remember that you can only have one policy per mailbox.
To start, navigate to the MRM Retention policies tab in Purview. Click New Policy.
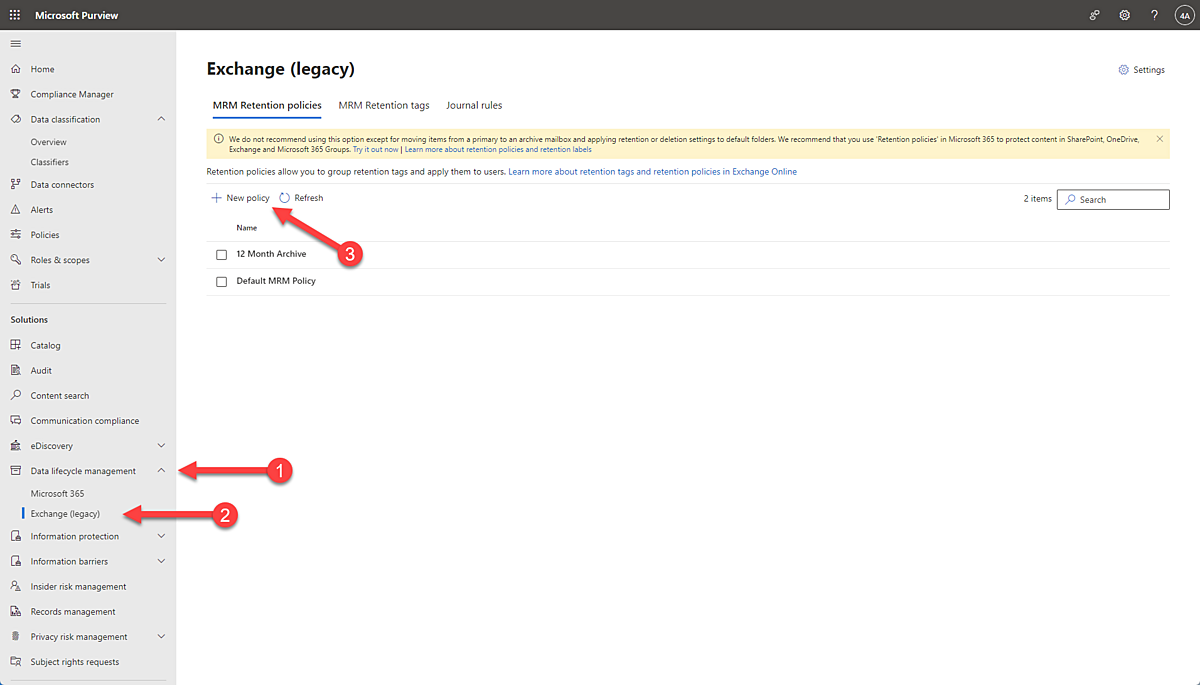
Give your policy a clear name and then click Add tag.

From here, you can pick all of the retention tags that you’d like to include in your policy.

Once you’re happy with your choices, click Next and then Submit.
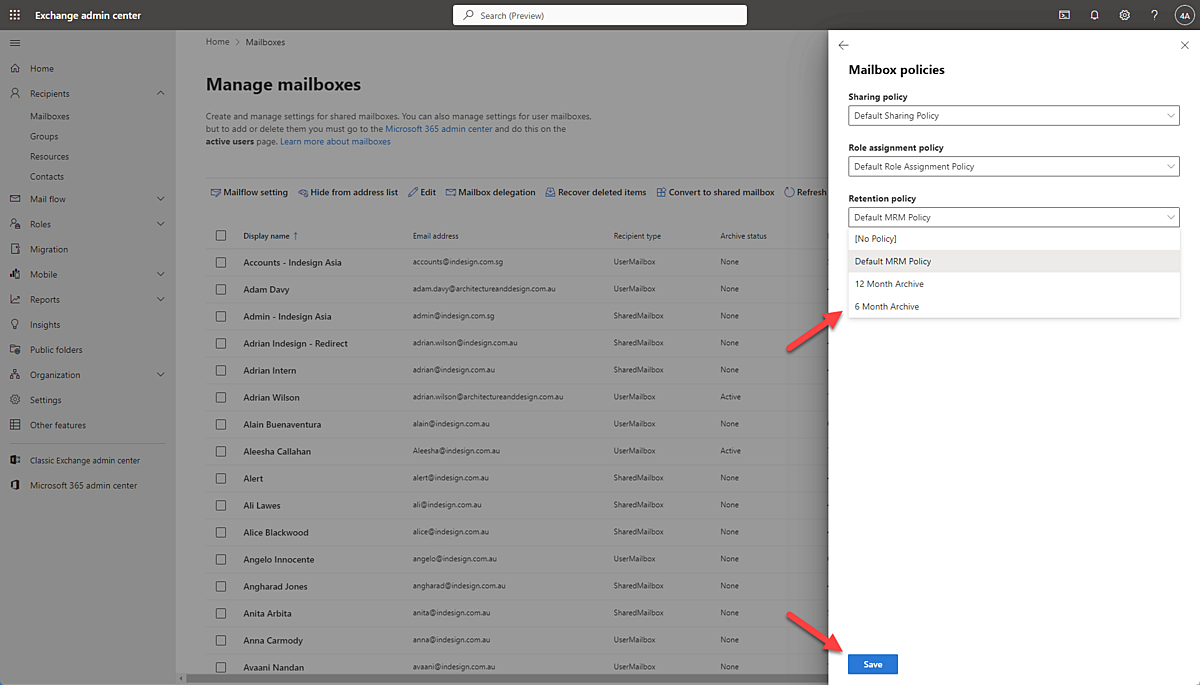
3. Apply the policy to mailbox users
Open the Exchange Admin Center. From here, select the Recipients dropdown, then Mailboxes, and choose the mailbox to which you want to assign your policy.
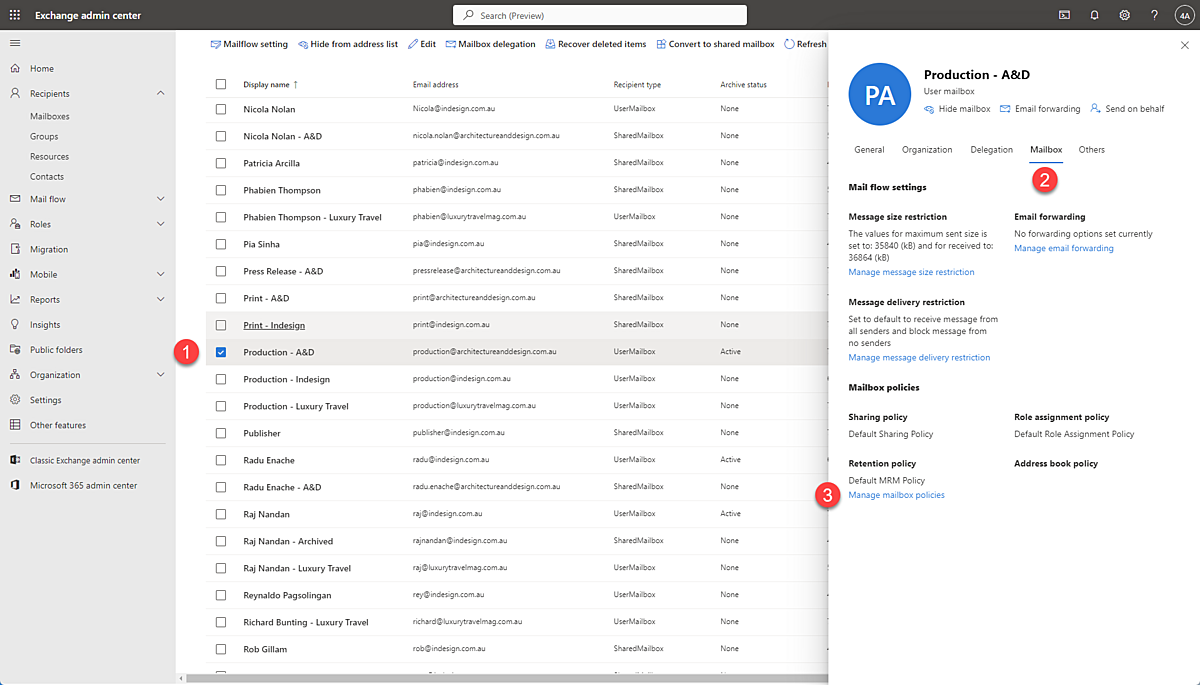
Click on Manage mailbox policies. This will open up a drop down of all of the policies you’ve created. Choose the one you’d like to assign, review the settings, and click Save.
The default MRM policy
It’s important to note that, when you first start with Exchange, there is a default MRM policy containing default tags that are available to all your users. If you do nothing, then these tags will still be available to users in their inbox.
These are the default tags. Keep in mind that you have the ability to delete these, modify them, or add new tags to the policy as long as it doesn’t violate the limits we described earlier. Think of this as a jumping-off point that you can customize to meet your own organizational needs.
How content deletion works in Exchange
Next, let’s look at how deletion works in Exchange mailboxes and public folders.
When an item is in a user’s email inbox or folders, what happens to it will depend on whether it’s modified or deleted during the retention period.
- If, during the retention period, the content has been modified or deleted by the user, it will move it to the recoverable items folder for the duration of the retention period.
- If the content has not been modified or deleted during the retention period, it will just stay in the user’s mailbox.
Once the retention period has passed, a cleanup process will run to delete the item. By default, this cleanup process happens after 14 days, but you can configure it to be up to 30 days if you’d like to have more time. After the time has passed, it will permanently delete the object, and you won’t be able to recover it.
Lastly, you need to be aware of the storage quota for the Recoverable Items folder. The default is a soft limit of 20 GB and a hard limit of 30 GB. If you exceed the quota, Exchange might start automatically purging the oldest items in the folder, even if they’re still within their retention period. It’s important to keep this in mind so you don’t lose critical data unexpectedly.
What are retention holds?
Finally, we need to touch on the concept of retention holds. This feature is designed to temporarily suspend retention when an employee has a long absence. Without it, if you have policies to archive or delete messages after a fixed period, it’s possible that Exchange will delete important emails by the time they return.
For example, let’s say that an employee goes on a year-long parental leave. The organization has a policy that moves items to the archive after three months and then deletes them after nine months. That means that, by the time the employee returns after a year, many months of emails will be unavailable and permanently deleted.
Retention holds do three things to prevent this:
- They suspend retention policies from processing on a mailbox.
- They allow you to set a retention comment so everyone knows the mailbox is on hold.
- They let you set a start and end date for the retention hold.
Keep in mind that you’ll want to set the end date to give the employee enough time to sort through their emails when they return to the organization.
To set a retention hold, you’ll need to access Exchange Online PowerShell and modify the properties of the target mailbox. Here’s a Microsoft support article detailing how to achieve this.
How tags are applied manually to content
Now that we’ve discussed the administration of email retention, let’s look at the end user’s experience.
End users can manually tag their folders or mailbox items with retention tags. To do this, they can right-click on an email and select Assign Policy. They will then be able to see all the available retention policies, including both MRM retention tags and Microsoft 365 retention labels, depending on what the user has access to. Keep this in mind when you’re planning your deployment; the experience may vary a little if both systems are in use.
Once the user has applied their retention tag, they’ll see a banner in the reading pane (normally above the body of a message) that shows the name of the Exchange Online retention policy or tag, its expiration date, and the number of days left before the item is deleted or archived. As a side note, this banner will only be visible for items with explicit retention tags applied.
Users can also apply a retention policy using rules. Here are the steps to take:
- Open the rules wizard in Outlook.
- Select the criteria to trigger the rule.
- Choose the action Apply retention policy.
- This will open a dialog box that lists all of MRM and Microsoft 365 retention policies.
- Now, whenever something meets the criteria of the rule, it will be labelled appropriately with the right retention period.
This is a handy way for users to apply retention policies without having to go through the process manually every single time.
Wrapping up
Exchange retention tags and policies will help you automate how your email content is retained and disposed of across your organization. With the information in this guide, you have everything you need to keep storage costs down and stay on the right side of compliance.
However, we’re well aware that configuring these processes manually can be challenging, and making your email retention and disposal truly automatic is equally difficult. That’s where RecordPoint can help.
RecordPoint offers a single centralized platform for data minimization and records management. We’ll give you full visibility over your data, help you manage retention schedules, and set you up for streamlined compliance, without the need for constant manual overhead.
With more than 900 connectors, including Microsoft Exchange, we’re here to help you achieve mailbox compliance at scale. Book a demo to find out more.
FAQs
What can you do with MRM?
You can do a lot with MRM, including:
- Remove all messages after a specified period
- Move messages to an archive mailbox after a specified period
- Remove messages based on the folder location
- Allow users to classify messages
- Retain messages for eDiscovery purposes
Of course, you can do much more with MRM depending on your business needs, but these are just some common scenarios to get you started.
Can I use MRM and Microsoft Purview retention policies at the same time?
Yes, both systems work quite nicely together. Microsoft Purview retention has broader coverage across the whole Microsoft 365, whereas MRM works well for mailbox retention policies, particularly on legacy configurations. However, keep in mind that policies with overlapping actions can clash with each other. For instance, a Purview label might override a conflicting MRM policy.
Do personal tags override retention policy tags?
In general, yes. If a user manually assigns a personal tag to an email or folder, that tag will override RPT or DPT. It’s important to keep this in mind and ensure your users know the implications of their tags and your general policies around retention and disposal.

🎧 LISTEN
Why records managers must play a key role in reducing risk | Anne Cornish, RIMPA
Discover Connectors
View our expanded range of available Connectors, including popular SaaS platforms, such as Salesforce, Workday, Zendesk, SAP, and many more.
Explore the platform
Remove data you don't need
Avoid risk, manage data more easily, and cut costs by removing unnecessary data with RecordPoint Data Minimization.
Learn More